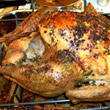
Turkey Tips: Grilled and Smoked Turkey
By: Allrecipes Staff
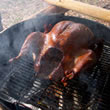
Smoked Turkey
One of the benefits of smoking a turkey is that it's almost impossible to overcook anything in a smoker. The temperature remains low and the cooking is slow, resulting in perfectly moist and tender meat with a rich, complex flavor.
The Tools
Besides a smoker, there are a few other things you'll need to smoke your turkey:
- A large pan
- An accurate meat thermometer
- Wood chips--any kind of fruit wood, such as apple or cherry, complements turkey very well, but hickory, pecan, and maple will be equally good
If you're smoking a whole bird, we recommended that you choose one weighing no more than about 15 pounds--large turkeys take too long to heat all the way through. If you choose a frozen turkey, it should be thoroughly thawed before you begin. (Ensure that you have removed all the giblets and gizzards from the turkey, as well as the plastic pop-up thermometer).
Prepping
To add even more flavor to your turkey:
- Try brining: while not an essential part of smoking a turkey, soaking in brine before cooking gives the meat maximum flavor and juiciness.
- Rub bird with oil or butter for crispy and evenly browned skin.
- Apply a dry rub just before smoking. (If you have brined the turkey, you should not use any salt in the dry rub).
Unfortunately, you can't stuff a smoked turkey; if you have your heart set on stuffing, you can make it separately in the oven.
Smoking Your Turkey
Once you have prepped your turkey, you are ready to begin smoking:
- Place turkey in the pan, breast-side up.
- Insert the meat thermometer deep into the thigh, being careful not to touch the bone or joints.
- Run your smoker at 240 degrees F (115 degrees C).
- Allow 30 minutes of cooking time per pound of meat.
- Baste the turkey with its own juices a few times during smoking, but avoid opening the smoker too often; you will lose heat and increase the cooking time.
When the thermometer reads 180 degrees F (82 degrees C), pull it out of the smoker and let it rest at least 15 minutes. Carve and serve.
 |
Grilled Turkey
Don't have a smoker? Use your charcoal grill. A 12-pound turkey is the largest that will fit most grills.
The Tools
To grill your turkey, you'll need:
- Good-quality charcoal briquettes: about 20 pounds
- Disposable aluminum roasting pan
- Soaked wood chips, if desired
- An accurate meat thermometer
- Tongs and heavy-duty oven mitts
- Recommended: a thermometer on your grill or deep-fat frying thermometer placed through the vent on the grill's lid
Prepping
Follow the instructions above for Smoked Turkey.
Grilling
Essentially, you'll be using your grill as an outdoor oven: you want a moderate, even temperature rather than searing heat. Arrange the coals on one side of the grill only--you will use the empty side for the drip-pan. When the coals are covered with white ash, add a handful of damp wood chips. Add more wood chips any time you add more charcoal.
- Lightly oil the grill's grate. Brush the skin of the turkey with oil or rub it with butter to prevent it from sticking.
- Set a disposable aluminum roasting pan next to the hot coals. This will catch drippings and prevent flare-ups.
- Adjust the grill's vents so they are open halfway.
- Many recipes suggest roasting the turkey in a second disposable pan, adding water, wine or aromatics to the roasting pan for basting.
- If your grill is outfitted with a thermometer (or you have inserted a deep-fat frying thermometer through the vent), check it. Aim for 350 degrees F (175 degrees C), but don't get hung up on a perfect and constant reading.
- Roast the turkey until the thigh meat registers 180 degrees F (85 degrees C). This may take two to three hours or longer, depending upon the heat of the fire and size of the turkey.
- Avoid opening the lid; conserve heat. Rotate the turkey as necessary for even cooking.
 |
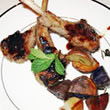
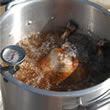
Deep-Fried Turkey
For succulent, juicy meat and crispy skin, try deep frying your turkey this year.
 |
diposting oleh sudir @ 20.04
0 Komentar
![]()